During the COVID-19, 3D printed mask frame has caught much attention from the public and professionals from different lines and fields. Since 3D printers have envolved so much and manufacturers have successed bringing dow the prices, it’s really good time for everyone to consider having one 3D printers. So what’s a 3D printer? How does it work?
Part One: What’s 3D Printer?
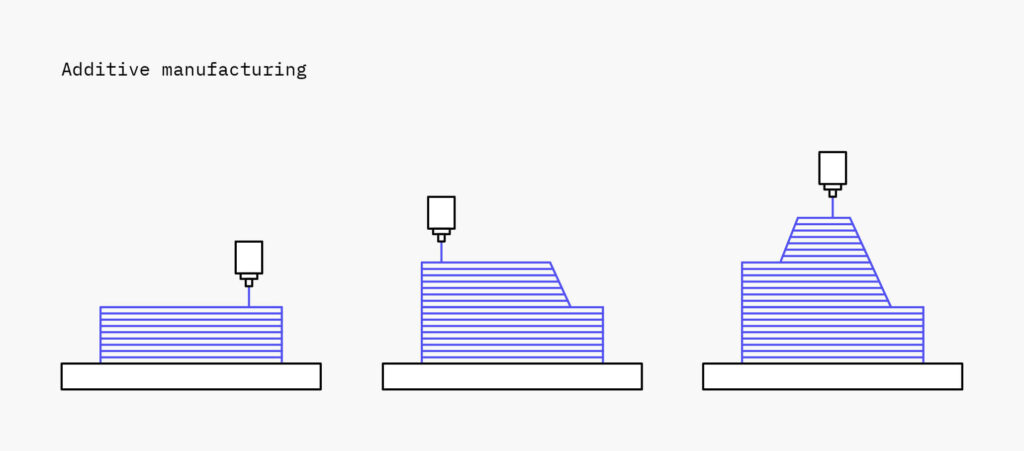
3D printing, also known as additive manufacturing, is the process of producing 3-dimensional objects from a computer file, where the part is built by adding material layer-by-layer.The creation of a 3D printed object is achieved using additive processes. In an additive process an object is created by laying down successive layers of material until the object is created. Each of these layers can be seen as a thinly sliced cross-section of the object. The whole printing process is done by and with assistance of a 3D printer. You might check our post to find how 3D printing help with traditional manufacturing.
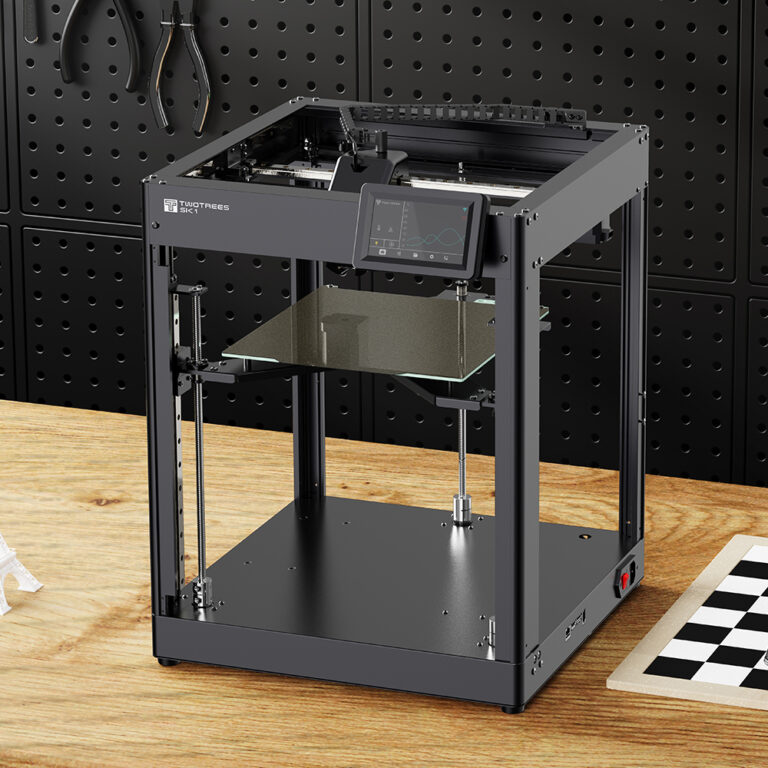
3D FDM printers are among those most popular and available 3D printers on the market. FDM 3D printers are widely available in market with very affordable price.You might check all our FDM 3D printers from Twotrees.
Part Two: Parts Of A 3D Printer
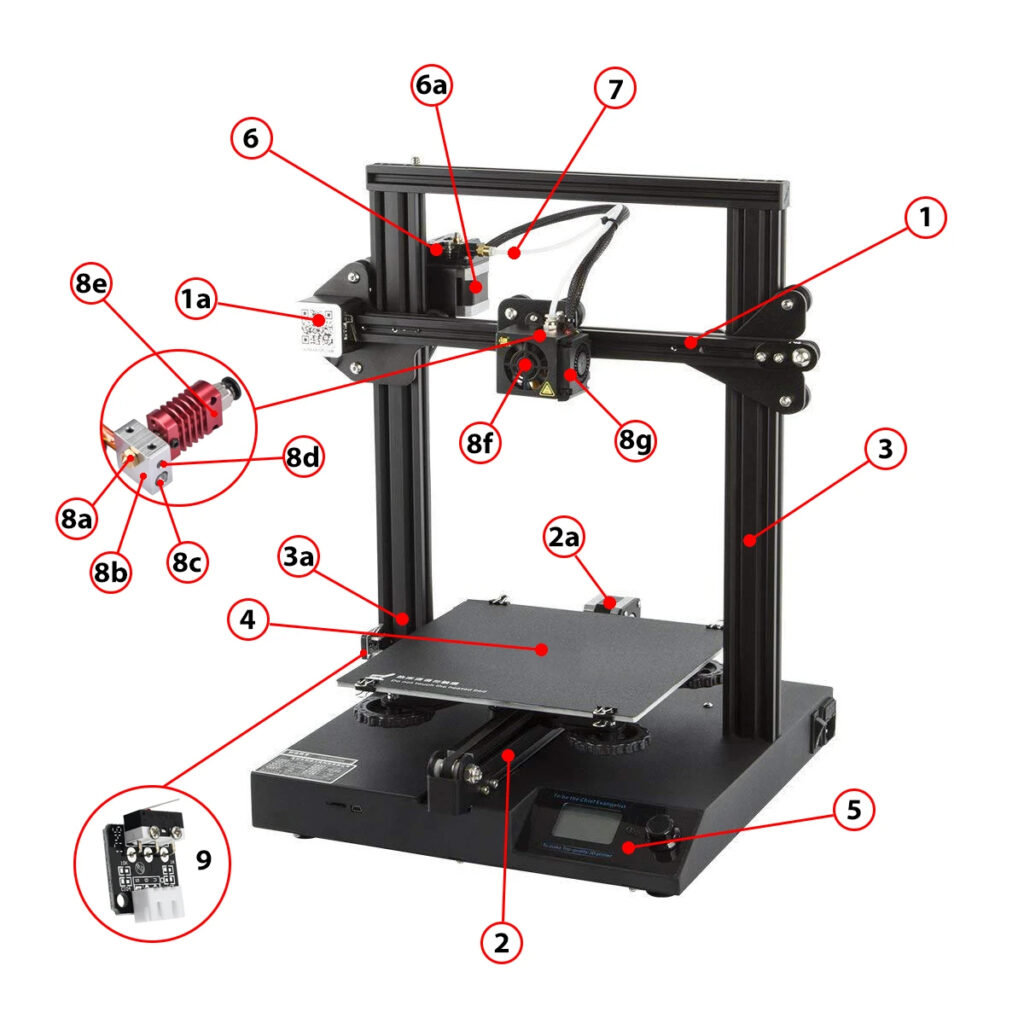
1. X-axis – The left and right motions move along the X-axis. 1a is the X-axis motor
2. Y-axis – The forward and backward motions move along the Y-axis. The print bed usually will move along the Y-axis. 2a is Y-axis motor.
3. Z-axis – The up and down motions move along the Z-axis. Z-axis motor – Behind frame
4. Print Bed– This is the surface where the print will be built on. The print bed surface that can be made of a variety of materials that help the print stick to the bed. PEI is a common material that can be added to the print bed and helps with adhesion. There are also more premium print surfaces such as FilaPrint by FilaFarm that benefits from easy remove of prints.
5. Controller – This is the brain of the printer. It is usually where interface for controlling the printer is and where all the other parts are plugged into. 3D printers have many kinds of firmware that can run on them. One of the most popular is Marlin.
6. Extruder – This is how the filament gets pushed into the nozzle for printing. There is a motor with a gear that turns and slowly pushes filament into the Hotend. There are many kinds of extruders that hold different properties such as the Flexion extruder that is specially designed for flexible filament. Extruders can come in 2 styles: bowden or direct drive. 6a is the Extruder Motor.
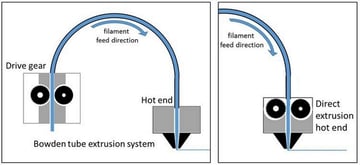
– Direct Drive: extruder driver is set in printhead for faster response, more accurancy, less energy consumption and wider option for filaments. However it also has some cons including heavier printhead, more viberation,less accurancy, more difficult for maintenance.
– Bowden Driver: extruder drive is fixed on frame.
7. Bowden tube – This is the tube that has filament running through it. This only applies to setups with a bowden style extruder.
8. Hotend – The hotend assembly is where the plastic melts so it can be deposited onto the print. The hotend is comprised of a few parts.
a–Nozzle – The nozzle gets hot and melts the filament. The nozzle is connected to the heater block. It comes in many sizes ranging from 0.1mm to as much as 2mm or beyond depending on the application. The typical size is 0.4mm. The nozzle can be swapped out for other sizes as needed.
b–Heater block – The heater block is where the heater cartridge is connected. There may or may not be insulation around the block. Insulation helps with preventing heat fluctuation.
c–Heater Cartridge – The heater cartridge runs through the heater block as the source of heat for the hotend.
d–Thermistor – The thermistor is positioned just inside the heater block and reads the temperature of the hotend.
e–Heat Break and Heat Sink- The heat break is the portion of the hotend that needs to be cooled in order to prevent the heat from the heater block from traveling too far up the hotend. Ideally the heat should be isolated to where the plastic is melting. Softening of the filament too far up the hotend will cause clogging.
f–Cooling fan – The cooling fan cools the heat break.
g–Part cooling fan – The part cooling fan quickly cools the material that has just been deposited. Not all printers have this and it is not always required. The requirement depends on the material being used. For example, PLA filament benefits greatly from being cooled quickly as opposed to ABS filament which may warp if cooled too quickly.
9. End stops/Limit switches – End stops mark the home position of each axis. When homing the printer (moving the axes to their home position), each axis will move towards these ends stops. Once it reaches the end stop, the movement of that axis will stop. This tells the printer that the axis has reached its home position.
10. Extras – these parts are not required but they are becoming more common place.
a– Auto level sensor – Auto level sensors are completely optional and they come in many different forms. Sometimes it will be used in place of an end stop for the Z axis. This sensor is used to measure where the low and high points are the on bed so that the printer can compensate for the differences. This allows the printer to print on the surface evenly even if the bed is uneven. This can eliminate the need to level the bed manually. An example of such device is the wildly popular BLTouch by ANTCLABS.
b– Filament sensor – This unit detects when the filament runs out and pauses the print.
Part Three: What’s Required for 3D Printing
To start printing, some preparation needs to be done.
- Prepare your design files for 3D models plan to print (Thingiverse is the largest repository of free-to-use 3D models on the web)
- Get an SD card to copy 3D model files
- Get A 3D Printer (FDM 3D printers are most common ones in market )
- Base Materials (You may check here to find some available 3D printer filament in market)
- A Slicer(Cura, Simplify 3D and PrusaSlicer is widely used by designers)
Part Four: How Does It Work?

Step One: Produce a 3D design file for the model with CAD software, usually in STL/OBJ/JPG format. For DIY users with limited knowlefe of CAD, website like Thingiverse woudl be an amazing place to hang around and find your interested models.
Step Two: Slicing the 3D model file with slicing software to convert file to G-code file which 3D printer controller could understand. (Cura is one most common and popular slicing software to get the work done)
Step Three: Set up the printer in accordance with manufacturer’s installation guide. You probably already knew that not all printers are delivered as complete set. Twotrees pre-assembled 3D printers could save you lots trouble but still needs few hands-on work.
Step Four: Transfer the sliced file to 3D printer with a SD card through connection with your PC.
Step Five: Choose the right 3D printing filament for your project and get every configurations right according to user manual from manufacturer.
Step Six: After everything set up, push the button and 3D printing would start automatically. After puch start button, the 3D printer might not start printing immediately cause it takes some time for nozzle to reach its working temperature. When printing actually begins, the extruder would push filameter to hot end to be melt and added layer by layer to form your designed model. Meantime the hot end would move right and left for horizontal positioning, X-axis move up and down for vertical positioning and hot bed move forward and backward to get right pringing point. For a FDM printer with CoreXY structure, the hot bed would be designed with auto leveling functions for less viberation and better performance.
Step Seven: After printing completed, remove the printed model from hot bed.Step Eight: Post-processing is also very important job to get idea result.
Part Five: Why 3D Printing is So Popular Now?
1. Must-have For DIY Enthusiast
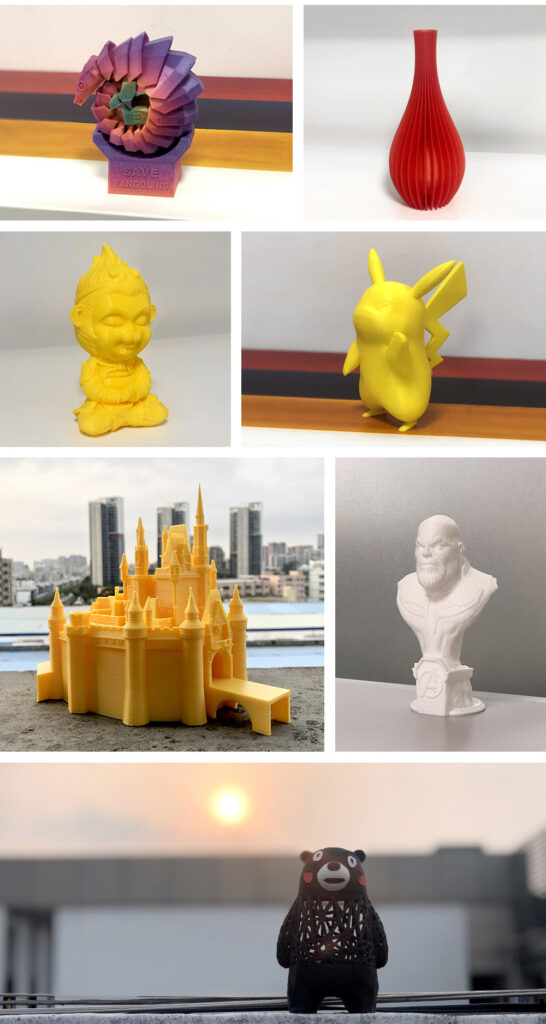
3D printers along with laser engravers are must-have tool kit for DIY enthusiasts as 3D printing set free of imaganation and creativity in so many ways. During past few years, 3D printign technology has been envovled so much that you cannot image how many things could be printed out. You might just read news about 3D-printed homes for sale in the US or Australia. As matter of fact, 3D printing is far more than a DIY tool for quite a long time. This also offers DIY users with much fun and possibility to play with 3D printers.
2. Affordable Price
The ever-growing market demand and rapid development of technology enable manufacturers to keep price for 3D printers much lower. A quick research, you might find hundreds of 3D printers with price around $500 or lower.
3. Growing Community
The community for 3D printing is growing every year as 3D printing training program has been introduced to many school and organizations. The growing user basis enables more people gather around to websites like Thingiverse to share their idea and happiness. As a result, 3D printing become much easier as 3D model designing is no longer a basic requirement.
4. Easy to Use
Instead of a complex professional tool designed for experts, Twotrees comsume 3D printers are designed for as entry level 3d printer that could be easily understood and handled.
5. Extra Bonus & Value
What’s more, a desktop 3D printers is not only a DIY tool kit but could bring your much value beyong your imagination. 3D printed mask frame to help fight against COVID-19 is just a corner of iceberg. 3D printing service business is rising these years. No matter you want a customized toy for your children or model prototype for new product launch, you might find cooresponding service provider in neighborhood. With a 3D printer or laser cutter, you might enven start your own business for home decor/promotion material printing. You might check our website regularly and find our post on 3D printing startup business ideas later.
