Though 3D printing is considered with outstanding advantages in rapid prototyping, the 3D printing speed is extremely low compared with the traditional manufacturing process. If you have printed a few 3D models, you might find it takes a few hours or maybe days to print a single model. Questions about “how to make 3d prints faster?” or “how to speed up a 3D printer” are some of the most asked questions in the community. Tips to Increase 3D printing speed seem to be some best demanding skills for 3D printer users. Thus, we round up this post to share some tips to save your time on printing.
11 Tips To Increase 3D Printing Speed
1. Increase Speed Settings Value
To speed up a 3D printer, the obvious and commonest way is to increase 3D printing speed in a slicer. Printing speed for regular FDM 3D printers could range from 40mm/s to 200mm/s, but 200mm/s is not necessarily the best setting for all printers. The idea of the sacrifice of speed for details is quite popular among the 3D printing community and the real challenge is to find the balance between speed and performance. Thus before making changes to printing speed, it’s recommended to run some print tests.
2. Higher Temperature Settings
To increase 3D printing speed, Temperature is the number one setting to adjust. Though increase print speed in a slicer could effectively reduce time spent on printing, it’s also with high potential to lose details for prints. In such a case, temperature plays an extremely important role in avoiding the problem. A higher temperature provides the nozzle enough time to melt filaments thus avoiding under-extrusion and filament grinding.
A recommended temperature increment is 5-15 °C for every 5-10 mm/s increase in print speed. The ratio might differ for printers from different models and brands, so take your time and play around to find the best combinations. In case of any missing layers or gaps in prints caused by under-extrusion, you might need to increase the temperature future more.
3. Larger Layer Height
Layer height is one most important factors to consider in terms of print quality. When talking about resolution in FEM 3D printing, it usually refers to and is determined by layer height settings. It works just like pixels in digital images. For two pictures of the same size, the one with more pixels provides much more details and is clearer than the other one. The lower the layer height value is, the more details the 3D prints would present but more time required to complete printing.
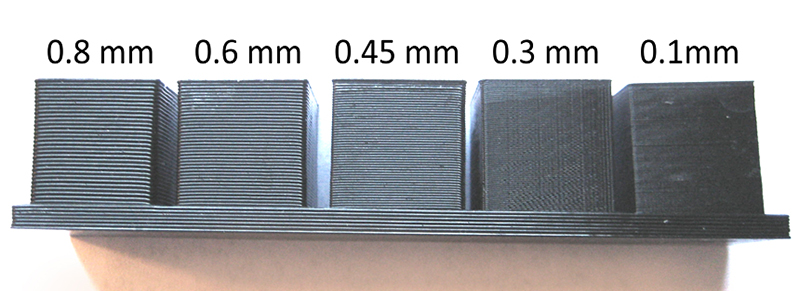
For example, a 10cm 3D printed lines, it might take 100 seconds to complete printing with a 3D printer of 0.1mm layer height settings and only 10 seconds for printers with 1mm layer height settings. Now, you see why layer height is one of the most significant settings, if not the most significant when it comes to reducing printing time. For a desktop consumer FDM 3D printer, the default layer height for most devices is 0.2mm and it’s recommended to increase the value by 25% if you want to increase print speed. If quality and details are of less concern in your products, you might even increase the value to 0.28mm or higher.
4. Right Infill Settings
Infill is another important way to achieve faster printing and save printing time and materials but also an essential factor that contributes to the strength of your prints. It also requires running a few tests to find the right combination. And in terms of infill settings, there are mainly two settings that could be applied to increase printing speed: infill pattern and infill density.
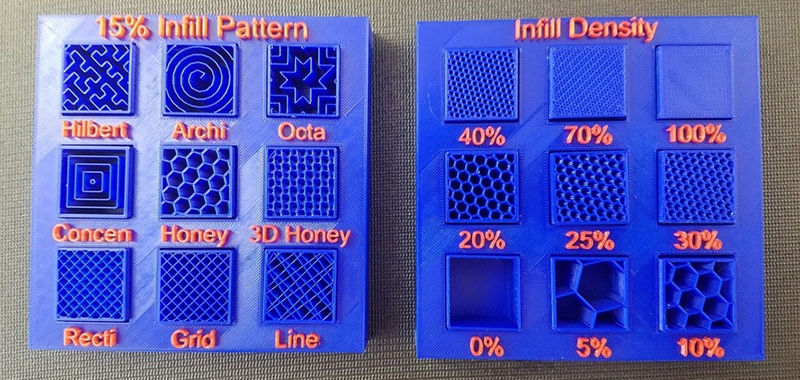
Infill Pattern: There are many infill patterns that you can use with their own advantages and disadvantages. Some patterns provide more strength in structure and some patterns require fewer movements compared with other patterns. One of the best infill patterns is rectilinear patterns which would save up to 25% of printing time depending on the 3D models.
Infill Density: As we all know that most 3D prints are not solid ones but with some hollow parts inside the model. Infill density is usually measured by a percentage ranging from 0 to 100% and 0% means no infill or supporting inside the model and 100% refers to solid models. It’s clear that hollow print requires less time and filaments but provides less supporting strength to other layers. Thus, it’s highly recommended to experiment with different infill patterns and the infill extrusion to achieve the result that meets your product requirements.
5. Lower Wall Thickness/Shells
Except for infill density, there is usually a separate setting for wall thickness. One main difference is that infill refers to the supporting structure inside the model and wall refers to the outer part of a 3D printing model. Setting the wall thickness a lower value is one way to save time and material, but it’s also important to provide enough thickness to guarantee it won’t be too fragile to break apart.
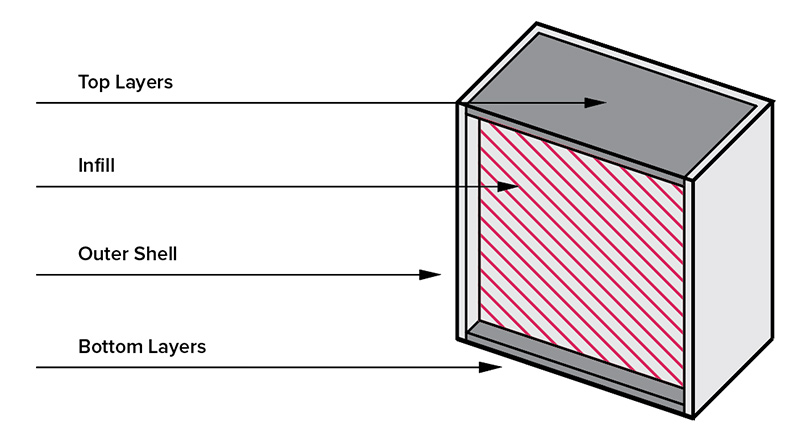
Special attention should also be paid to the ratio between wall thickness and infill density. If the infill density value is too low, it’s a great chance to find sunken parts on the surface of 3D prints. If the infill density value is too high and the wall thickness value is insufficient, you might see the infill patterns on the surface. Both situations should be avoided as printing failure.
6. Removing or Reducing Supports
Supports use extra materials to build support structures in 3D printing models to hold up steep overhangs and bridges. It does a great job to guarantee 3D printing success. Slicers might add supports to your 3D model files while slicing if you activate this setting and set a minimum overhand angle, for example, 45 degrees. Many experienced 3D printer users or engineers, might try to avoid the use of supports in the stage of designing.
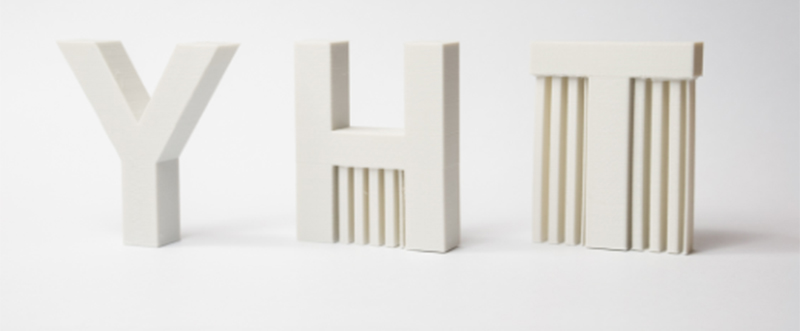
However, the fact is that a very large part of available models on the website requires supports to complete printing. One trick to get rid of supports for these models is rotating and positioning 3D models in an orientation where all overhand angles are less than 45 degrees. There are also plugins like Auto-Orientation Cure Plug-in to help orient your model automatically to require the least amount of support.
7. Choose Right Adhesion Assistants
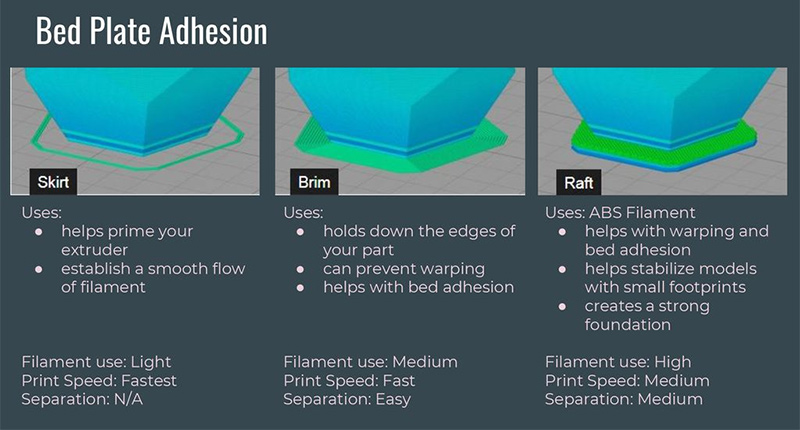
Adhesion assistants are usually added in form of rafts, brims, and skirts to increase the adhesion to the build plate and it’s also one good way to prevent 3D printing warping (check 10 tips to prevent 3D printing warping ). To achieve higher print speed, it’s recommended to use a skirt or a brim if necessary and avoid rafts as it consumes more materials and takes more time.
8. Produce Several Prints in The Same Batch to Increase 3D Printing Speed
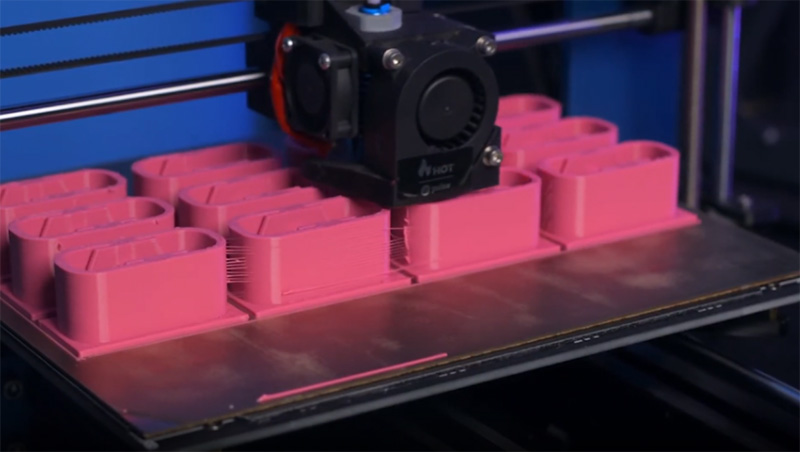
If you are planning to print a few small models or huge models that could be split into a few smaller parts, printing a few parts with single printing would save you lots of time. You no longer need to reset and reheat the printer for each part or model, and some repeated movements could also be skipped safely without losing any details. For some users without any experience, you might use the center and arrange function in the slicer to help you with model orientation. Once everything is set up, you would enjoy the ease of the mind.
9. Higher Travel Speed
Travel speed in 3D printing refers to the speed when the printer head moved away from one position to a new position without extruding material. By increasing travel speed, you can save significant amounts of print time, but with a chance to cause ringing or ghosting artifacts or even layer shifting. Thus it’s necessary to run some printing tests for different travel speeds and use the optimal settings for your printers.
10. Use a Large Nozzle
Using a larger nozzle is an easy way to print a 3D model faster but it might also cause quality degradation and details losses. If you use a large nozzle but a smaller layer height, the print might maintain decent quality. But if you are using a larger nozzle with larger layer height settings, the chance is big that you gonna find visible lines and rougher surfaces on prints. Thus few tests on nozzle size and layer height combination would save you lots of trouble.
11. Use Wider Extrusion Line Width
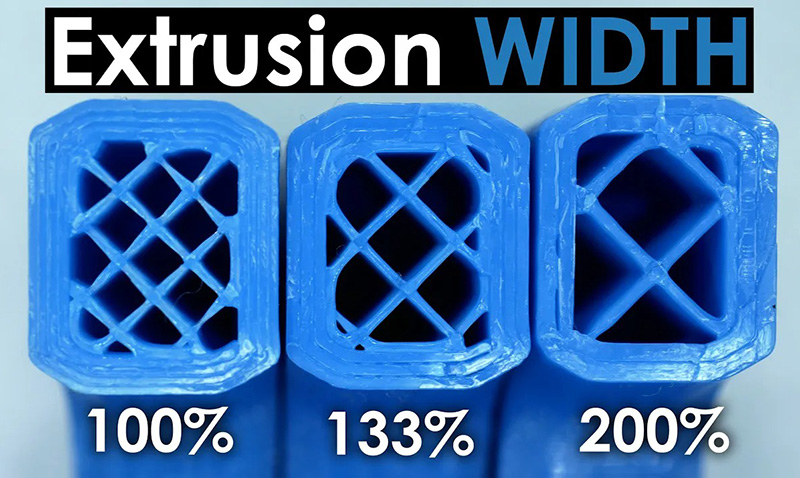
Line width is another setting that could help increase the extrusion volume except for print speed, nozzle diameter, and layer height. However benefits of wider extrusion width are far more than that, it could also help increase layer adhesion and produce stronger parts. But be aware that using wider extrusion width increases the chance of layer gaps and lower print quality with fewer details.
Speed VS Quality: Which Is More Important?
Speed and quality have always been discussed together concerning how to increase 3D printing speed. Though it’s necessarily true that one can hardly have both, users tend to work so hard to achieve faster printing that they might overlook the visible losses in quality. Thus before you take further steps to speed up your printer, it would always be a good idea to take a second thought: which is more important for your projects.
There are three factors to consider before making your decisions: structure strength, print details, printing speed. Functional parts are usually designed with higher requirements for strengths. Models designed for aesthetic display require more details. As for more, I always choose to spend more time getting decent prints with more details and stronger structure. If you are familiar with all settings and like to play around, why not make some tests to achieve the optimized combinations and settings.
